
Mobile app full guide
4 min read
Mobile App Guide
Introduction
Welcome to the Allday Time Systems Mobile App Guide
This document will cover:
- Initializing the mobile app set-up on FreeTime Pro
- Downloading the Allday Time Mobile app
- Allday Time systems Mobile app overview
Initializing the mobile app setup on FreeTime Pro
Log into the FreeTime system, using your admin account.
- From the FreeTime Prime dashboard, click ‘Personnel”
- Next, click the ‘View tab’
- Select the employee who you wish to grant access to the Mobile \ Kiosk app.
- For the employee to access the Mobile \ Kiosk apps, they will need a valid email address and a pin on their employee record.
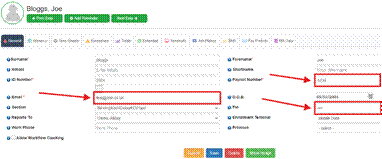
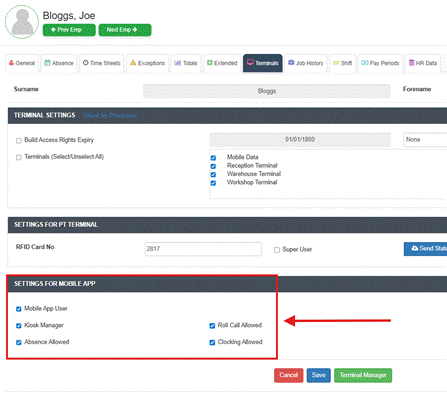
- They will all need permission to access the mobile app. This is granted from within the employees “Terminals” tab.
- Here you will need to tick “Mobile Attendance App User” and then click “Save”.
Note*: Once the Mobile App permission is granted the employees Name, Email Address and PIN will be set as read-only on their “General” tab. If you need to edit these, please remove access to the mobile application, then make the changes and grant access to the mobile app once again. - The employee will now be able to access the mobile applications using their email address and password as well as being allowed to Clock IN \ OUT.
Should you wish the employee to be able to request absences, run a roll call report and extra, you can grant these permissions from the mobile app.
Downloading the Allday Time Clock
The “Allday Clock-In” mobile application is available for both Android and Apple IOS.
To download the “Allday Clock-In” application please browse to your mobile phone application store (“Google Play” on Android or “The App Store” on IOS) and search for Allday Clock In.
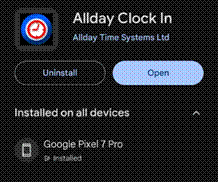
Figure 1 – Google Store
Allday Time systems Mobile app overview
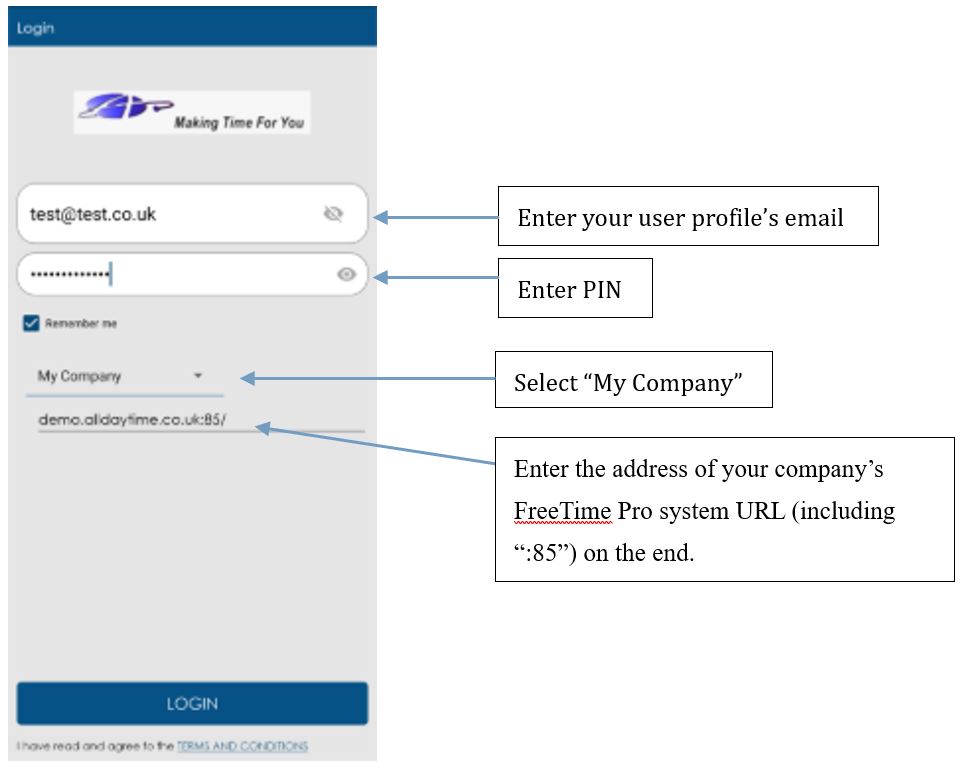
When you first open the Allday Clock-In you will be presented with the “Login” screen.
On first login you will need to provide your “Email address” and “PIN”, along with the URL address of your companies FreeTime Pro system (the manager of your attendance software should be able to provide these)
When you have the above details, these will need to be entered onto the login screen as per the example below.
Once logged in you will see the home page. This is where you can clock, view your geo location, look at your clocking history from using the app and pull a fire report if sufficient permissions have been given.
Clock in/Out
The Home page displays
- Clock-In
- Clock-Out
- Roll call
- Logs
The Clock-In/Out buttons allow an employee to clock in and out from their live location. The Roll call button allows you to run a report of employees currently Clocked In. However, this button requires your admin user to grant their employee roll call permissions on within your employee profile.
Note*: A pop-up confirmation will appear when you have successfully clocked in/out.
Viewing Clocking Events
To view all your Clock-Ins/Outs from the Home page, click on the ’Logs’ tab.
This tab displays all your logs, between the date ranges positioned top of the page. Each log contains details such as
- Date of the Log
- Entry/Exit
- Time
You can filter the logs by the dates by selecting the date input field and choosing new dates. Once you have chosen your new dates, click the search icon to filter the logs by your dates selected.
The ‘Other Logs’ tab allows you to view clocking’s made on terminals as well as manual clocking’s.
Note*: Ensure your phone is set to a 24 hour clock format [UPDATE]
Roll Call
If you have been granted “Role Call” permissions by your administrator \ manager, you will be able to use this option to run a report of employees currently Clocked In, on company site or any specific terminals.
.
Viewing and Requesting Absences (Optional Extra)
For the option view and request absences, the mobile app requires a subscription to” Workflow +”
Note*: For more information on Workflow plus contact support@alldaytime.co.uk
To view your absences from the home page, click on ’ABSENCE’ top of your screen
The ability to view and request absences from within the Mobile app requires a subscription to “Workflow +” .
If you have access to the “Absence” tab, this will display any Approved, Requested or Cancelled absences. This will also allow you to request an absence.
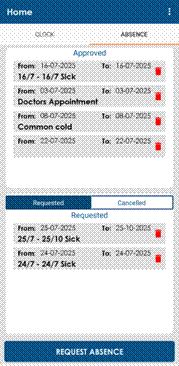

- To request an absence, select “Request Absence”. this will display the “Absence Request” screen.
- On this screen simply;
- Select the Date Range (From \ To)
- Select the “Absence Type” using the ‘Select Absence Type’ dropdown.
- Enter any notes regarding the Absence for your manager.
- Click “Save” once completed


